Sometimes a one-size-fits-all POM doesn’t fit. Imagine your project requires various configurations (dependencies, plugins, properties, etc.) tailored to different deployment environments (testing, development, etc.) or operating systems. You need to build the project differently for every scenario.
Does it sound complicated? Don’t worry: I’m here to help you. This post explains how to make a perfect-fit suit using Maven profiles.
>>  Read this post in Spanish here <<
Contents
- What’s a Maven Profile?
- The Problem
- Solutions
- Working with Profiles in Development Environments
- Automatic Profile Activation
- Deactivating Automatic Profiles
- Sample Project
What’s a Maven Profile?
A Maven profile defines a set of configurations, such as dependencies, properties, or plugins. It can be activated manually or automatically based on certain conditions, such as the version of the operating system on which Maven is running. This way, activating and deactivating profiles lets us pick the suitable configuration when we run a Maven command.
The <profiles> section of the POM contains the definition of the profiles for the project:
<profiles>

   <profile>
      <id>profile_1</id>
        ...
   </profile>

   <profile>
      <id>profile_2</id>
        ...
  </profile>

</profiles>
Each profile has a unique name (<id>). The ellipses can contain sections dependencies, repositories, pluginRepositories, plugins, properties, modules, reports, reporting, dependencyManagement, and distributionManagement. As for build, the following elements are supported: defaultGoal, resources, testResources, finalName, directory, filters, pluginManagement, and plugins. In sum, profiles offers us a plethora of customization possibilities.
Let’s delve into the practical utility of Maven profiles. We’ll start by addressing a real-world problem and then explore how to activate profiles automatically.
The Problem
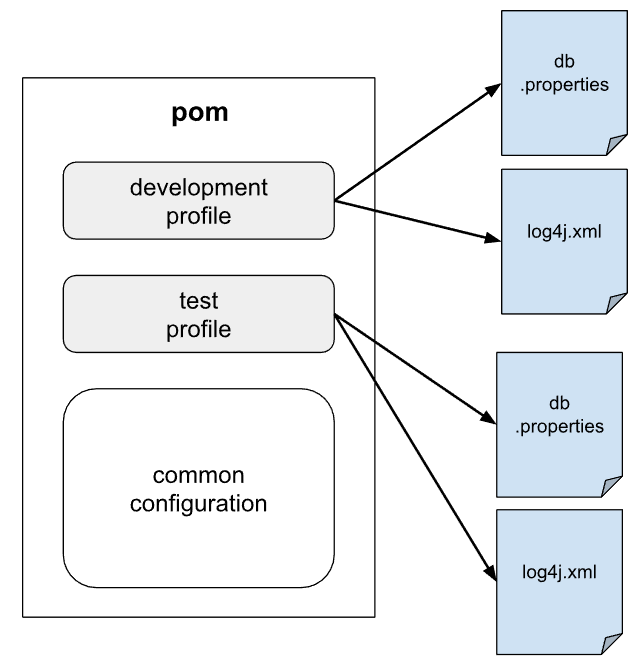
Let’s consider a Maven project that consists of a web application that requires two configuration files: one for the Log4j logging system and another named db.properties with a database connection setup.
We need the same application to use a customized database and log configuration in different environments, such as each programmer’s development computer and a test server. We’ll create one Maven profile for each environment to meet this requirement. I’ll show two approaches; pick the one that works best for you.
Note. In modern development, challenges related to deploying software in different environments are often addressed by leveraging containerization technologies (Docker, Kubernetes).

Solutions
Defining Variables in the POM
This technique involves defining properties, or variables, in each profile containing the values that change between environments. The project only needs therefore one pair of files db.properties and log4j.xml. Maven will adapt their contents to the environment we indicate.

Follow this recipe:
1-. Create a <profiles> section containing the two profiles. Inside each one, declare the variables and their values in a section:
<profiles>
    <profile>
        <id>development</id>
        <properties>
            <log.level>DEBUG</log.level>
            <db.url>jdbc:mysql://localhost:3306/profiles</db.url>
            <db.user>dev</db.user>
            <db.password>devpassword</db.password>
         </properties>
        </profile>
        <profile>
            <id>testing</id>
            <properties>
                <log.level>INFO</log.level>
                <db.url>jdbc:mysql://192.168.1.30:3306/profiles</db.url>
                <db.user>pro</db.user>
                <db.password>45fgU23</db.password>
            </properties>
        </profile>
</profiles>
¡Watch out! Never version or distribute sensitive data such as passwords. In the example, I assume that the test server contains nothing important.
2-. Use the properties in the files where you want them to be replaced by the values set in the POM.
/src/main/resources/log4j.xml:
<root>
   <priority value="${log.level}" />
   <appender-ref ref="console" />
   <appender-ref ref="file" />
</root>
/src/main/resources/db.properties
driver=com.mysql.jdbc.Driver
db.url = ${db.url}
db.user = ${db.user}
db.password = ${db.password}
In the case of the Spring Boot configuration files (application.properties, application.yml), use this format:
spring.datasource.username = @db.user@
As you can see, you must enclose the name of the variable with “at” signs.
3-. Enable resource filtering. This feature allows Maven to process the files of specific directories and replace them with the variables corresponding to the properties declared in your POM. These properties include the ones of the active profiles.
The setup for the /src/main/resources directory:
<build>
    <resources>
        <resource>
            <filtering>true</filtering>
            <directory>src/main/resources</directory>
        </resource>
    </resources>
</build>
That’s all.
Activating profiles
When you run a command, specify the profiles you want to activate by adding the -P parameter followed by the profile names separated by commas. This command activates the “development” profile:
mvn clean package -P development
If you request a profile that doesn’t exist, Maven 3 prints a warning:
[WARNING] The requested profile "foo" could not be activated because it does not exist.
Maven 4 is more strict. It raises an exception that cancels the execution of the command:
[ERROR] The requested profiles [foo] could not be activated or deactivated because they do not exist.
I like this new ruthless behavior—it protects us from typos and other mistakes. Nevertheless you can indicate that a profile is optional by prefixing its name with “?”:
mvn clean package -P development, ?foo
One File Per Environment
Another option is to create different configuration files for each environment. As a result, the project will contain a pair of db.properties and log4j.xml files: one pair for the developers’ computers and another pair for the test server.
Tell Maven how to pick the right files:
1-. Organize the files in directories by environment. Create those directories outside /src/main/resources; this prevents additional configurations.

2-. Create the profiles as in the previous section. This time, you only have to define a property that sets the directory containing the specific files for the profile:
<profiles>
        <profile>
            <id>development</id>
            <properties>
                <profile.dir>src/main/profiles/development</profile.dir>
            </properties>
        </profile>
        <profile>
            <id>testing</id>
            <properties>
                <profile.dir>src/main/profiles/testing</profile.dir>
            </properties>
        </profile>
    </profiles>
3-. Maven must include in the artifact that packages the project (JAR or WAR) the files located in the path defined by profile.dir, as well as the files located inside /src/main/resources/. You achieve this with the following configuration:
<build>
    <resources>
        <resource>
            <directory>src/main/resources</directory>
            <filtering>true</filtering>
        </resource>
        <resource>
            <directory>${profile.dir}</directory>
            <filtering>true</filtering>
        </resource>
    </resources>
</build>
Done. You activate a profile with the -P option, as I explained:
mvn clean package -P development
This technique is slightly simpler than the previous one, but requires maintaining several configuration files.
Working with Profiles in Development Environments
Integrated development environments (IDEs) that support Maven enhance the development experience by seamlessly allowing the activation and deactivation of profiles. This is the case with IntelliJ and Eclipse IDE, the most popular Java IDEs.
IntelliJ
IntelliJ provides a tool window named “Maven.” It shows the profiles and lets you select the active ones. In rare cases, if the profile change has no effect, clicking on the “Reload All Maven Projects” button does the trick.
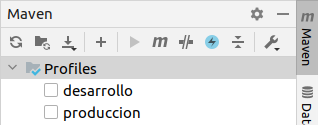
Can’t find the window? Open it from the “View” -> ”Tool Windows” menu.
Eclipse
You manage the profiles in this IDE through the “Maven” section displayed inside the project properties window. You open that window by right-clicking on the project in the “Project Explorer.”
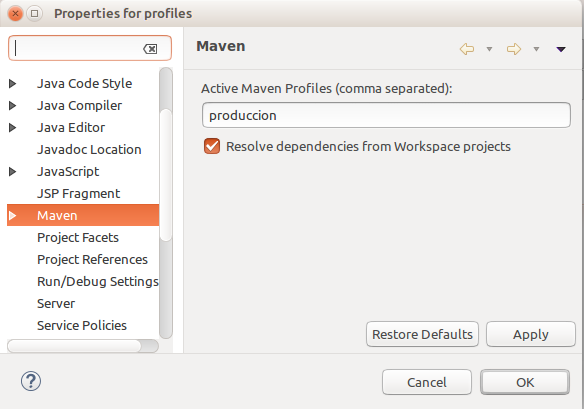
A more comfortable alternative: the “Control+Alt+P” shortcut opens the following window.

Automatic Profile Activation
What are the ways to trigger profiles automatically?
Pick your choice! There are seven strategies or conditions. Plus, you can combine different types of conditions in one profile so that the profile is only activated if all activation conditions are met. At the end of this section we’ll discuss a realistic example of these combinations.
Tip. Maven Help Plugin prints which profiles are automatically activated:
mvn help:active-profiles
For All Projects (settings.xml)
The settings.xml file is the Maven global configuration file. Its default location is the /conf folder inside the Maven installation directory.
The typical reason for editing this file is to configure the credentials to use private repositories for downloading dependencies and uploading artifacts. Another common reason is to set up the credentials for corporate proxies, which allegedly protect us from the bad guys.
However, what interests us in this tutorial is the <activeProfiles> section. It lists the profiles that must always be activated (if they exist in the project):
<activeProfiles>
    <activeProfile>windows</activeProfile>
</activeProfiles>
By the way, you can create global profiles in the settings.xml. They are available for all the projects.
Based on an Environment Variable
Variables given to Maven with the -D parameter, operating system variables, and Java properties are supported. An example of the former:
mvn clean install -Dname.property=value
This is how we define a variable whose presence activates the profile:
<profile>

    <activation>
        <property>
            <name>PROFILE</name>
         </property>
    </activation>
The activation condition can be the absence of the variable (notice the ! character):
<profile>

    <activation>
        <property>
            <name>!PROFILE</name>
         </property>
    </activation>
Or the exact value of the variable:
<profile>

    <activation>
        <property>
            <name>PROFILE</name>
            <value>dev</value>
         </property>
    </activation>
Based on the POM packaging format
Maven 3.9 (February 2023) adds support for evaluating the POM packaging format (JAR, WAR, EAR) by checking this property:
<activation>
      <property>
        <name>packaging</name>
        <value>jar</value>
      </property>
Based on the Existence of a File Within the Project
Just like that:
<profile>

    <activation>
         <file>
            <exists>src/main/resources/custom/profile.dev</exists>
         </file>
    </activation>
Maven evaluates the non-existence of a file if you switch <exists> to <missing>.
Profiles Active By Default
Just set the <activeByDefault> element to true:
<profile>

    <activation>
        <activeByDefault>true</activeByDefault>
    </activation>
Important. The default profiles are only automatically activated when no other profiles are activated by the -P parameter or any other automatic activation methods. Therefore, “active by default” doesn’t mean “always active.”
Based on the Operating System
This is a real example:
 <profile>
        <id>test-windows-docker-url</id>
        <activation>
            <os>
                <family>windows</family>
            </os>
        </activation>
       <build>
          <plugins>
              <plugin>
                  <groupId>org.apache.maven.plugins</groupId>
                  <artifactId>maven-surefire-plugin</artifactId>
                  <version>${maven.surefire.version}</version>
                  <configuration>
                     <systemPropertyVariables>
                         <DOCKER_HOST>tcp://localhost:2375</DOCKER_HOST>
                      </systemPropertyVariables>
                  </configuration>
              </plugin>
         </plugins>
     </build>
 </profile>
You’ll find it in the Jakarta EE Course projects’ POM (only available in Spanish). Those projects rely on Arquillian Cube to run tests that need Docker containers. I had to set a property named DOCKER_HOST with a specific URL for Windows because the default URL only works on UNIX systems.
How do you specify the operating system? Use these properties from the Maven Enforcer plugin. Here’s an example from the documentation:
 <os>
     <name>Windows XP</name>
     <family>windows</family>
     <arch>x86</arch>
    <version>5.1.2600</version>
  </os>
Based on the Version of Java that Runs Maven
<profile>

    <activation>
        <jdk>11</jdk>
    </activation>
jdk sets the Java version that activates the profile. The example considers versions that start with “11”; that is, Java 11 and its revisions: 11.0.1, 11.0.2, etc. The activation condition ignores later and earlier Java versions.
To cover a large group of Java versions, provide a range according to the pattern explained here. For instance, this activation condition is triggered when Maven runs on Java 11 or later:
<activation>
    <jdk>[11,)</jdk>
</activation>
Combining Activation Conditions
The preceding example evaluates the Java version. What about the vendor that builds and distributes the Java binaries? Maven lacks an option for checking the vendor, but consider these facts:
- There’s a condition that evaluates variables, including Java properties.
- Java’s
java.vendorproperty contains the name of the vendor.
- Activation conditions are combinable as long they are of different types.
If you connect the dots, you’ll come up with a condition like this:
<activation>
   <id>Eclipse-17</id>
  <jdk>17</jdk>
   <property>
      <name>java.vendor</name>
      <value>Eclipse Adoptium</value>
    </property>
</activation>
Problem solved. The example shows an activation for Eclipse Java 17, whose java.vendor value is Eclipse Adoptium.
Deactivating Automatic Profiles
We want automatic profiles to be triggered when necessary—that’s why we created them in the first place! Yet we occasionally need the opposite in order to test, experiment, or debug configurations. Although we might temporarily change the POM, there’s a super easy alternative…
Besides activating profiles, the -P option prevents a profile from being activated if you add the «!» or «-» character before its name.. Here’s an example:
mvn package -P !testing,!docker,developer
The command applies the developer profile and ensures that testing and docker profiles are never activated. It doesn’t matter if testing and docker activation conditions are met.
Sample Project
The sample project is available on GitHub. Chapter 2 analyzes it. For more information, check out this tutorial: How to Import Repositories from GitHub with Git, Eclipse, and Android Studio \ IntelliJ.
Other Posts in English
Spring Framework: asynchronous methods with @Async, Future and TaskExecutor
Spring Framework: events handling
Spring Boot testing: Docker with Testcontainers and JUnit 5. MySQL and other images
