
The app developed in the tutorial “Android Design: Light and Dark Theme with Material Components” features both a light and a dark theme—but it has a flaw. Users can only switch themes by turning Android’s dark or power-saving modes on and off. In this tutorial, I’ll explain how to create a theme selector like the one that WhatsUp —and many other popular apps— provides.
>>  Read this post in Spanish here <<
Contents
Setting a theme from the code
First, let’s see how to set the current theme from the app’s code. It’s as simple as calling the AppCompatDelegate#setDefaultNightMode() method, which sets a theme based on the Android configuration. The valid arguments are four modes of operation, declared as constants in the AppCompatDelegate class. I list them in this table:
MODE_NIGHT_NO | Use the light theme. |
MODE_NIGHT_YES | Use the dark theme. |
MODE_NIGHT_AUTO_BATTERY | Use the dark theme when the power-saving option is on; otherwise, use the light theme. |
MODE_NIGHT_FOLLOW_SYSTEM | Use the dark theme only if dark or power-saving modes are on; otherwise, apply the light theme. This is the default behavior and applies as long as setDefaultNightMode() is not invoked. |
AppCompatDelegate.setDefaultNightMode(AppCompatDelegate.MODE_NIGHT_AUTO_BATTERY);
The call to setDefaultNightMode() applies the mode immediately, causing the app to recreate the activities if the current theme needs to be changed. Also, the set mode is only effective during the current execution of the app, for it’s discarded when the app stops.
Given the above behavior, we should call setDefaultNightMode() in two places of our code. Where? We’ll see them in due time.
Preferences screen
Let’s provide the user with a way to select one of the modes discussed in the previous section. As I mentioned, the solution I propose is a preferences \ settings screen like WhatsUp’s.

We can implement the above screen with the tools provided by Google Android Jetpack. Of all the available libraries, we use this:
implementation 'androidx.preference:preference:1.2.1'
According to the documentation, “The Preference library allows you to build interactive settings screens, without needing to handle interacting with device storage or managing the user interface.” Well, it’s a bold statement. Let’s test it.
Designing the layout with ListPreference
First, we define the preferences screen in an XML file in the /res/xml/ directory. I named the file app_settings; here it is:
<?xml version="1.0" encoding="utf-8"?>
<androidx.preference.PreferenceScreen
    xmlns:android="http://schemas.android.com/apk/res/android"
    xmlns:app="http://schemas.android.com/apk/res-auto">

    <androidx.preference.ListPreference
        android:key="@string/settings_theme_key"
        android:title="@string/settings_theme_title"
        android:icon="@drawable/baseline_settings_brightness_24"
        android:dialogTitle="@string/settings_theme_dialog_title"
        app:useSimpleSummaryProvider="true"
        android:entries="@array/settings_theme_entries"
        android:entryValues="@array/settings_theme_values"
        android:defaultValue="@string/settings_theme_default"/>

</androidx.preference.PreferenceScreen>
XML root is the androidx.preference.PreferenceScreen element. It defines a settings screen based on the AndroidX libraries. Within PreferenceScreen we add components that represent configurable preferences. The Design view of the Android Studio file editor lists the pre-existing components.
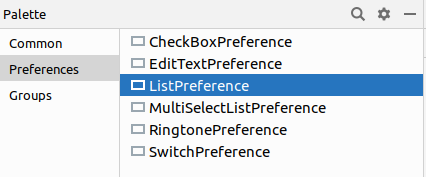
ListPreference is the droid we’re looking for: it shows a list of options in a dialog. Out of all of them, the user can select one.
These are the main attributes of ListPreference:
android:key. The identifying name of the preference that is managed by the component. Attention to the trick: I have defined in thestrings.xmlfile the name so that I can access it from the code with a constant:
<string name="settings_theme_key" translatable="false">theme</string>
As you see, the preference is named theme. The name doesn’t matter, however, for we’ll use the constant that represents it (R.string.settings_theme_key).
android:title. The title for the preference. It’s the text that the user will see.android:icon. The icon that represents the preference. It’s a drawable resource.android:dialogTitle. The title of the dialog box with the list of options assignable totheme.app:useSimpleSummaryProvide. Whentrue, the component shows the current value for the preference.
The options
It remains to discuss the ListPreference attributes related to the possible theme values—that is, the configuration options. The sample app will offer three: light theme, dark theme, and the MODE_NIGHT_FOLLOW_SYSTEM behavior, which is the default. Each option has two elements: the name that the user will see on the screen and the value. The reason is that the value of each choice is always the same, but the name varies depending on the language.
Here are the values in our example, declared in the file /res/values/array_theme_values as an array of strings:
<?xml version="1.0" encoding="utf-8"?>
<resources>
    <string-array name="settings_theme_values">
        <item>@string/settings_theme_value_default</item>
        <item>@string/settings_theme_value_light</item>
        <item>@string/settings_theme_value_dark</item>
    </string-array>
</resources>
Again, I use the strings.xml file to declare values as constants that can be called both in XML and in the code:
    <string name="settings_theme_value_default" translatable="false">DEFAULT</string>
    <string name="settings_theme_value_light" translatable="false">LIGHT</string>
    <string name="settings_theme_value_dark" translatable="false">DARK</string>
Let’s set the name of each option. Since the sample application has English (default) and Spanish languages, we need the names in both languages. Therefore we create two XML files with the translations, again with the array format. They have the same name and are located in the directory that corresponds to the language:
/res/values/array_theme_entries.xml:
<?xml version="1.0" encoding="utf-8"?>
<resources>
    <string-array name="settings_theme_entries">
        <item>System default</item>
        <item>Light</item>
        <item>Dark</item>
    </string-array>
</resources>
/res/values-es/array_theme_entries.xml:
<?xml version="1.0" encoding="utf-8"?>
<resources>
    <string-array name="settings_theme_entries">
        <item>Predeterminado del sistema</item>
        <item>Claro</item>
        <item>Oscuro</item>
    </string-array>
</resources>
Watch out! Except for the strings.xml texts, the order of the items in all the files must be equivalent for the translations to match. It’s also the order they appear on the screen, as the following image shows (click to enlarge).

Now we can finish the description of the ListPreference attributes:
android:entries="@array/settings_theme_entries"
android:entryValues="@array/settings_theme_values"
android:defaultValue="@string/settings_theme_default"/>
android:entries. The name of the file with the names of the selectable options in the list.android:values. The name of the file containing thethemevalues.android:defaultValue. The default value fortheme. Remember that the value of a preference will benulluntil the user selects a value for the first time. And whennull, the preferences screen displaysdefaultValueas the selected value.
PreferenceFragmentCompat
The preferences layout is managed by a fragment that extends PreferenceFragmentCompat:
public class SettingsFragment extends PreferenceFragmentCompat {

    @Override
    public void onCreatePreferences(Bundle savedInstanceState, String rootKey) {
        setPreferencesFromResource(R.xml.app_settings, rootKey);
    }

}
The preceding little piece of code is enough for the user to see the screen, open the dialog by tapping the preference, select an option (the value for the theme), and save it. The statement from the Preference library documenttion I quoted earlier doesn’t lie.
Yet something else is needed: calling the setDefaultNightMode() method to apply immediately the selected choice. You achieve this by binding a listener, or callback, of type Preference.OnPreferenceChangeListener to ListPreference. The only method of the listener will be invoked each time the user changes the value of the preference and will receive that value as an argument.
This listener calls setDefaultNightMode():
@Override
public void onCreatePreferences(Bundle savedInstanceState, String rootKey) {
     setPreferencesFromResource(R.xml.app_settings, rootKey);

     getPreferenceManager()
                .findPreference(getString(R.string.settings_theme_key))
                .setOnPreferenceChangeListener((preference, newValue) -> {
                    ThemeSetup.applyTheme((String) newValue, getContext());
                    return true;
                });
}
Line 6 gets the object representing ListPreference to bind the listener to it, coded as a lambda expression. I’ve encapsulated the listener operation in this class because we’ll reuse it later:
public final class ThemeSetup {

    private ThemeSetup() {
    }

     public static void applyTheme(String mode, Context context) {
        if (context.getString(R.string.settings_theme_value_dark).equals(mode)) {
            AppCompatDelegate.setDefaultNightMode(AppCompatDelegate.MODE_NIGHT_YES);
        } else if (context.getString(R.string.settings_theme_value_light).equals(mode)) {
            AppCompatDelegate.setDefaultNightMode(AppCompatDelegate.MODE_NIGHT_NO);
        } else {
            AppCompatDelegate.setDefaultNightMode(AppCompatDelegate.MODE_NIGHT_FOLLOW_SYSTEM);
        }
    }

}
The applyTheme() method calls setDefaultNightMode() with the mode associated with the new value for theme.
Activity and menu
As you might expect, the fragment is part of an activity:
<LinearLayout xmlns:android="http://schemas.android.com/apk/res/android"
    xmlns:tools="http://schemas.android.com/tools"
    android:layout_width="match_parent"
    android:layout_height="match_parent"
    android:orientation="vertical"
    tools:context=".settings.SettingsActivity">

    <com.google.android.material.appbar.MaterialToolbar
        android:id="@+id/toolbar"
        navigationIcon="?attr/homeAsUpIndicator"
        android:layout_width="match_parent"
        android:layout_height="?attr/actionBarSize" />

    <androidx.fragment.app.FragmentContainerView
        android:id="@+id/settingsContainer"
        android:tag="@string/settings_fragment_tab"
        android:name="com.danielme.android.dark.settings.SettingsFragment"
        android:layout_width="match_parent"
        android:layout_height="match_parent" />

</LinearLayout>
We have a MaterialToolbar and a FragmentContainerView that embeds a fragment of type SettingsFragment.
The activity that manages the previous layout:
public class SettingsActivity extends AppCompatActivity {

  public static void start(Context context) {
    Intent intent = new Intent(context, SettingsActivity.class);
    context.startActivity(intent);
  }

  @Override
  protected void onCreate(Bundle savedInstanceState) {
    super.onCreate(savedInstanceState);
    setContentView(R.layout.activity_settings);
    setSupportActionBar(findViewById(R.id.toolbar));
    getSupportActionBar().setDisplayHomeAsUpEnabled(true);
  }

}
And that method start()? I usually create a static method that encapsulates the activity’s launching. Although this isn’t the case for SettingsActivity, this strategy is especially helpful when I must provide arguments to the Intent.
The activity in the manifest:
<activity
            android:name=".settings.SettingsActivity"
            android:label="@string/settings_toolbar">
            <meta-data
                android:name="android.support.PARENT_ACTIVITY"
                android:value=".MainActivity" />
        </activity>
Finally, let’s allow the navigation from the MainActivity to the preferences screen by using a menu:
<?xml version="1.0" encoding="utf-8"?>

<menu xmlns:android="http://schemas.android.com/apk/res/android"
    xmlns:app="http://schemas.android.com/apk/res-auto">

    <item
        android:title="@string/toolbar_action_settings"
        app:showAsAction="never" />

</menu>
@Override
public boolean onOptionsItemSelected(@NonNull MenuItem item) {
  SettingsActivity.start(this);
  return true;
}
Ta-da! Users can select an option.
Setting the mode on application startup
Regardless of what the video suggests, the theme selector is useless. As I pointed out, the mode set by setDefaultNightMode() isn’t preserved between app executions. So each time the app starts, it must set the mode the user selected in the preferences screen—if they ever select one.
You execute code during the startup of an app in a subclass of the Application class. Its onCreate() method is invoked before the creation of any activity. In this method, you obtain the global Android context with this because the Application class is a Context subclass. Thus, all you need is a class like this:
public class LightDarkApplication extends Application {

    @Override
    public void onCreate() {
        super.onCreate();
        ThemeSetup.applyTheme(this);
    }

}
ThemeSetup class now makes sense. It requires a new method:
public static void applyTheme(Context context) {
        SharedPreferences defaultSharedPreferences = PreferenceManager.getDefaultSharedPreferences(context);
        String value = defaultSharedPreferences.getString(context.getString(R.string.settings_theme_key),
                context.getString(R.string.settings_theme_value_default));
        applyTheme(value, context);
 }
applyTheme() gets the store that keeps the preferences, a SharedPreferences. Then, it requests the value of the theme preference, represented by the constant R.string.settings_theme_key. Notice the second argument of the getString() method: it’s the default value if the user didn’t select the theme property, so it must match the value set in android:defaultValue. The last line calls the applyTheme() method we created earlier.
One crucial detail: Android only executes your custom Application class if you declare it in the manifest.
 <application
        android:name=".LightDarkApplication"
        android:icon="@mipmap/ic_launcher"
        android:label="@string/app_name"
        android:theme="@style/AppTheme.LightDark">
Now we’re done. The sample app provides a preferences screen with a theme selector.
Code
Download the project from GitHub. For more information, consult “How to Import Repositories from GitHub with Git, Eclipse and Android Studio\IntelliJ”.
